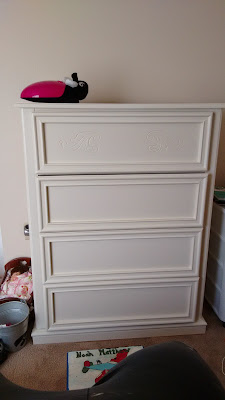
Because we're cheap and didn't want to spend $500 for a single dresser at a furniture store, I decided to try out my painting ability. I had already gotten some practice on staining the kitchen cabinets, so I thought maybe I'd try painting this time. After researching a bunch more blogs, I decided milk paint was the way to go. What's milk paint, you ask? No it doesn't have milk in it (I may or may not have believed that for a while). Here's the definition. Basically it's amazing paint. Because I loved the gel stain from General Finishes, I decided to stick with that company and try out their milk paint. I was impressed with their color selections.
After much deliberation I decided on Antique White for the color. I wanted a very 'boring' color so it wouldn't clash with their room colors. And as their styles changed I didn't want to have to repaint them.
So with that decision made I started scouring Craigslist for cheap dressers in need of TLC.
 |
| I found this beauty and it's matching tall dresser. It also had a mirror attached. |
 |
| While I was at it I decided to find a headboard/footboard for Hannah's new full size bed. And that's how I came to own this beauty. |
So then the fun began.
As with my last post, here's the steps I used::
1) clean that wood with a good cleaner/degreaser like Krud Kutter or something similar. Since these items had never been in a kitchen a dregreaser wasn't as important, but I had it on hand so that's what I used. Again I'm
2) Degloss. I used the same product I did for the kitchen cabinets since I had it on hand and it worked so well for the cabinets. Sanding is only necessary if you find a rough spot on the wood.
3) Paint away. Let me mention something here. If your wood is very dark and you're trying to paint it a light color, you must use a primer first! For the bed, the wood was so light I didn't bother with a primer. However, for the dark dressers, I did prime first. I used a product called Stix. Amazing product. I linked the product on Amazon, but you can find it locally too. I'm pretty sure I bought it at The Woodsmith Store. It literally sticks to anything. The base of the dressers were real wood, but the tops were particle board. It was imperative to use a product that would adhere to the glossy particle board.
 |
| Making progress. Those ball things were a bear to paint! |
5) DONE! Let dry for at least 24 hours and cure for about a week before adding knobs or using for clothes/bedding.
 |
| The dresser. I really liked the detail on the first drawer. We have since added knobs. |
 |
| The mirror before we hung it on the back of the dresser. Ignore the mess in the background. This was in our apartment as we were trying to pack/move. |
 |
| Finished headboard |
 |
| Hannah's bed with the finished headboard/footboard. |


No comments:
Post a Comment