Thursday, March 17, 2016

Boy's State Tournament

So I went to the first day of the boy's state tournament on Monday.  I wasn't planning on going, but my cousin and family was coming down from NW Iowa to watch it (he's a coach up there) and his wife is my best friend, so I took the day off work and tagged along.  I had no real investment in any of the teams.  In fact, I didn't even know who was playing.  I was just there to watch and chat with Sandy.

It turns out my alma-mater was playing, well sort of.  I graduated from Grandview Park Baptist School.  That school no longer exists.  But when they closed the doors to GPBS, they reopened in a different location as Grandview Christian School.  So, I suppose I can kinda sorta call them my alma-mater?  Maybe.  Either way, I haven't followed their team so I really didn't care who won or lost.

Since it was the first day of the tournament, it was class 1A.  Basically the smallest schools in the state.  So a lot of teams I've never heard of before.  We saw some good games, and some not so good games.  Here's what I learned from watching 4 games that day::

1) High school boys are young.  I know they're just teenagers, but I don't think I realized how young they are.  I swear I was never that young.
2) I watched one team play catch the entire time.  They would throw the ball back and forth to each other for about 20 seconds and then someone would shoot a 3-pointer.  That was their entire game.  Not surprising, the other team figured it out pretty quickly that they team playing catch was a one-trick pony show.  And guess what?  The pony show lost.  Because throwing 3-pointers the entire game and only making about half of them doesn't win a game.
3) There are some hot-heads playing high school basketball.  I watched one guy get seriously close to punching a ref more than once.  Every time he was called for a foul, he'd raise his hands in the "what'd I do" look and get all up in the refs face.  I'm surprised he didn't get kicked out.  And then he'd push the other team's players around.  Time to find your zen, my friend.
4) I am convinced that the ushers at Wells Fargo Arena got together, figured out what the most ineffectual way of herding the crowds was, and then just did that.  It was ridiculous.  Sandy and I got up and one point to stretch our legs a bit.  We found a table out of the way to just sit and chat until the next game started.  An usher came up to us and told us we needed to move.  When  I asked why, he responded that the current game was going to be letting out soon and the "worst thing that could happen" was for us to sneak in and steal seats while the next game's fans were waiting to be let in.  Huh?  Worst thing?  Worse than the bubonic plague?  It got worse.  As we were walking back to our seats another usher refused to let us down because it was the rules.  What rules?  Where did I miss reading rules about sitting?  Later, my cousin got up to stretch and was waiting at the top of the stairs for a time out or a break in the action to return to his seat.  He didn't want to block anyone's view of the game.  Nice gesture, right?  Apparently that's not allowed.  An usher told him he needed to move.  When he asked why?  He wasn't in anyone's way and he was just waiting for a good time to head down the stairs, she insisted he move along.  So basically, someone in management told these ushers to make everyone as annoyed as possible.  Mission accomplished!
5) High school boys make mistakes.  These things happen.  Refs make mistakes too.  There are 3 refs.  So that's 3 sets of eyeballs watching 10 guys run around.  There are approximately 300 fans in the audience.  That's 300 sets of eyeballs.  Guess who's at a disadvantage?  Lay off the refs.  They're doing the best they can.  If you think you can do better, go ahead and get your license and do it (ref license?  Is that a thing?)
6) I was actually happy with who won the games.  Here's why: For a small school in a larger city, there are so many opportunities for sports.  For a small school in a small town, this may be their one chance to do something great.  You could tell in the stands which school came from money and which didn't. For so many of these parents and fans, they took days off from their jobs to drive a long distance and watch their team play.  Winning is a big deal for them.  You could see the absolute joy in their faces when their teams would do well.


The NCAA tournament is coming to our town.  I'm hoping for some good underdog stories!  I always love when smaller schools get put on the map by beating a high ranked team.  I'm cool like that.  :)

Thursday, March 10, 2016

Sometimes I make a bad call...

So my last post was about the dresser with the stained top.  I loved it.  If I were planning on keeping it, I would've put it somewhere it could be seen by everyone who came to my house.  Unfortunately no one else seemed to like it.  *cue tears and sobbing*.

SO I changed it.  It wasn't a big deal.  Rather than just paint directly on top of the stain, I first used a primer (Stix) and then painted over that.  So now the top of the dresser looked the same as the rest.


After making these changed I tried to sell it again.  And it sold within a day.

So,..what I learned from this was that even though I might love a look, I have to think about what others like.  Man, that's annoying.  :)

Monday, February 8, 2016

Dresser Project!

So for the 5 of you who actually read my blog and follow along, you know I've been refinishing a dresser.  To refresh your memory, here's the beauty when I bought it.
She was a little rough around the edges.  So I cleaned her, stripped the paint, and started the painting.  I couldn't decide what I wanted to do, so of course I turned to my wisest council...Pinterest.

These were the two options I narrowed it down to.  Both are General Finishes Persian Blue milk paint, but the top one has a java gel stain on the top surface.  The bottom is glazed in Van Dyke Brown.  I couldn't decide which one I liked the best so then I turned to my Facebook friends.  And that helped exactly zero.  Everyone thought differently.  My uncle told me if I painted it two different colors I'd be "ruining it".  But my uncle isn't known for his decorating sense so...I didn't put a lot of stock in what he said.
After much deliberation, I decided on....the stained top with a glazed base.  Why?  Because I liked the look and wanted to try it.  No other reason than that.

Starting the process by staining the top.  

There's a little nick in the wood on the top, but I decided not to fix it because I think it gives the piece character.
She's an old dresser, so she's going to have some stories to tell.
Starting to paint.  Isn't it beautiful?  And yes those are random cans I'm using to prop it up off the floor.
I'm cheap crafty like that.


I love the difference in color.


So that was the painting portion.  I liked it, but I wanted to glaze it. When using glaze it's a tricky thing.  Basically you paint it all on and then wipe it off.  I've tried wiping it off with both paper towels (the dry method) and baby wipes (the wet method).  The baby wipes are a lot easier to use, but you end up wiping almost all of it off.  Which means you may end up glazing for a second time just to get the look you want.
Here's the glaze before wiping it off

After wiping it off.  The glaze sticks to any imperfections in the wood to give it a distressed look.
I ended up glazing twice because I wanted a little more to stick.

You can see the glaze in the grooves of the drawers.  
So then after getting the glaze the way I liked it, time to seal it.  I used a General Finishes Top Coat in flat finish.  Love that stuff.

And here's the finished look:


I lined the drawers because the wood was in rough shape even after scrubbing it
Here's a side-by-side look:

Thursday, February 4, 2016

Stripping Paint

Let's be honest: Stripping paint off furniture has to be one of the worst things ever.  I mean seriously.  You pour on some toxic chemical that literally melts the paint off the wood.  And somehow this isn't bad for humans?  That's why, up until now I have avoided stripping paint like a whore avoids church.  But then I got this beauty...

 Let's take a moment and just look at her.  She's puuuurty.  But she was old and run down.  Poor thing.  It was my duty to make her beautiful again.
Her top is a little scratchy
In the past when I've repainted furniture I've just cleaned it, deglossed it, and repainted.  But this gal needed a full body treatment.  She was rough.  

First I gave it a good scrubbing with my favorite cleaner, Krud Kutter.  Seriously, buy it. Then it was time to face my nemesis, Paint Stripper.  That would be a good super-villain name...but I digress...

I used a product called CitriStrip.  As always I had researched and read a million blogs before actually committing to this, so I chose CitriStrip because it doesn't use super harsh chemicals and it smells like oranges.  

After removing all the hardware it was time to put on the first coat.  What I like about CitriStrip is that it's a gel.  So it sticks pretty well.  You just use a paint brush.  (I used a cheap one because I figured the paint stripper would ruin the brush and I didn't want to ruin an expensive one.)  The bottle said to make sure the room is well ventilated, but honestly it's January in Iowa.  It's cold.  I cracked open the front door but the fumes weren't a big deal.  I didn't wear protective eye wear either because I like to live on the edge.  I did wear gloves though.  

So after putting on a thick layer of the orangy-pink goo, I waited a while.  It says to wait anywhere from 30min-24 hours.  Whoa.  Big time span there.  Within a few minutes I could see the goo start to bubble up.  
The top starting to bubble

You know what the bubbles remind me of?  Barnacles.
So after about 45 minutes I got impatient and started scraping.  Make sure you use a plastic paint scraper, not some metal spatula looking thing.  I bought a plastic one at Home Depot for like $2.  If you use something other than plastic you could scrape off a big chunk of wood instead of just the paint.  *Another tip is to have a garbage bag or other plastic bag with you to attempt to keep the mess to a minimum*
There's wood under there!

It's looking almost pretty.

The drawers SUCKED to scrape.  And notice all the debris on the tarp?  It was messy.  OH, that little black spoon looking thing is my paint scraper.  It's a handy little thing.
I knew it was going to take another layer of stripper.  Ugh.  So back to putting on another layer.  I put on a thicker layer this time.  Like literally scooped up the goo and smeared it all over.  And I waited longer.  I waited for about 2 hours this time around.  
You can see the goo starting to work it's magic on the old paint and varnish.

Check out that awesomeness.  That was one swipe with my handy scraping tool.  Also, gross.  It was like black slime when it scraped off.  
After scraping and scraping, I rewashed everything with my Krud Kutter.  It was amazing how dirty this dresser was!  I'm pretty sure a prior owner was a smoker because I swear I was wiping off soot.  
WHAT?!  It's back to it's original wood!  It was cool that I could see where the original drawer pulls were.

I love the differences in wood grain.  


I also sanded all the wood to make sure any rough edges were gone.  And whatever paint needed a little incentive to give up the fight.
SO now it's ready for paint.  I'm in the process of doing that and will post when I'm done.  


Sunday, January 31, 2016

Restuffing couch cushions

We've had our couches for over 10 years.  They aren't anything super special, but we bought them new and actually got to pick the pattern for them.  They are England brand.  (highly recommend that brand, by the way).  These couches have moved with us twice and were stuck in storage for 6 months.  They've been troopers.  But lately they've been showing their age.  Over Christmas when we had a house full of people, you could just about touch the floor after sitting down.  The support was nearly gone.  I'll admit I had a few giggles watching Joel's family members trying to get up out of the couch.  They'd try to get a running start to boost themselves up.  Cue perverse laughter.

So it was time to do something.  Because I don't have a few thousand dollars just sitting around waiting to be spent on new furniture I turned to my good friend Pinterest.  I figured others would have the same problem I did.  Yep.  So many pins on how to fix your couch cushions.  After reading a bunch of blogs and watching a few videos I gave it a try.

Here's what you need::
1) Scissors or sharp knife for cutting foam
2) Cheap paint drop cloths, or other type of thin plastic (get the same number of plastic as you do cushions)  I bought a 3-pack for $2.67 at Menards.  Since I had 6 cushions to do, I bought 2 3-packs.
3) Foam inserts.  I bought these, but you can get what you want.
4) Vacuum with hose attachement
5) Garbage bag to throw away all the debris

Here's how it went::
Step 1: Take off your cushion covers.  There should be a zipper somewhere on the side so you can just whip those suckers off.  I went ahead and washed them all.  These cushions had seen a lot of use over 10 years, including 2 children potty-training.  They needed a good washing.  I just threw them in the wash on cold in the delicate cycle and then hung them up to dry.  No problems with shrinkage.

Step 2: After you take off the covers you're going to see something like this:
  It's a foam insert covered in what looks like quilt batting and a cover of some sort.  I've seen other that only have a quilt batting covering the foam.  Whatever.  The point is that you need to get straight to the foam.  SO, this is what I did...
 Take off whatever is covering the quilt batting, if you have anything there.  Just rip it off. Be gentle, but get it off.
The "open" the foam.  Mine was adhered together on three sides so I gently pried it apart.  Now it looks like a book.  Some might have the two pieces of foam completely separated.  Good for you.  That little square piece of foam was all the extra support that came with the cushion.

Step 3: Time to insert new foam.  I ordered 2 big pieces of foam from Amazon.  I knew I'd have to cut them to size, but that was fine with me.  I put the big piece of foam snug in the 'book' and closed it.
*Now there are some blogs I read that said you need to use spray adhesive to make sure everything stays put.  I didn't do this for the simple reason that I forgot to buy any at the store and I wasn't making a trip just for that.  But do what you want.
 Now it kinds looks like a big sandwich.
Then I cut the foam to size.  As you can tell I was super precise about it.  I just hacked it with some scissors.  The foam company website said you could cut it with a bread knife, but I didn't want to get up from my comfy spot on the floor and my scissors were right next to me.  Notice the square piece of foam that was original to the cushion.  I figured I'd just put that in for kicks.


Step 4: Time to get everything back in your freshly washed cushion cover.  Now's where it gets cool.  Here's the fun part.   Get the cheapest piece of plastic you can find (I used paint drop cloths because I watched a video and that's what they did...buy the cheap ones though)  You're going to end up having to rip that plastic to shreds so you don't want anything too tough.  Wrap the cushion in the plastic.
Then take your vacuum hose and shove it in between the foam inserts.
Turn on the vacuum and watch it shrink down to nothing.

While the vacuum is still running (this is important), slide the cover back on.
When you have the cover in the correct position turn off the vacuum and watch the magic happen. (If you turn off your vacuum before you have the cover in position the foam will reinflate as you're positioning it.  Makes it really hard to get the cover all the way on)
BOOM! The foam has reinflated and it's all snug in there.

Step 5: Get the plastic out of there.  Now aren't you glad you took my advice and bought the cheapest, thinnest plastic you could find?  After trying this a few times I learned a little trick to this.  Reach your hands down as far as you can between the plastic and the cover and made some tears.  Start pulling it out.  Then flip it over and pull from the bottom.  Because you made tears all across the bottom it should be pretty easy to get the plastic to slide out.

Now to zip it all back up. Be careful at this point.  You'd think zipping would be easy, right?  Well the cushions are a lot fuller than they were when you took off the covers so just be prepared to shove some foam back where it belongs.  Go slowly and you'll do fine.

And DONE!  Get some wine and sit back on your new fluffy cushions.

Cost::
Foam: 15.95 x 2 = $31.90 (there was free shipping when I bought it from Amazon)
Plastic drop cloths: $2.67(for a 3 pack) x 2=$5.34
Total Cost: $37.24

It took me about an hour to stuff everything back in to the covers.  Is it perfect?  No.  Are they as good as the day we bought them?  No, but there are close.  The couches are 10 years old, nothing will change that.  But it by doing this I've given them a few more years of life, that's a win in my book.

Monday, January 25, 2016

Another project...

Before we moved to our new house I knew the kids needed new dressers.  Hannah was using my old one from when I was a kid and it was quickly falling apart.  Noah was still using his old changing table at we had bought new when Hannah was born.  So, it was small and almost 10 years old. 


Because we're cheap and didn't want to spend $500 for a single dresser at a furniture store, I decided to try out my painting ability.  I had already gotten some practice on staining the kitchen cabinets, so I thought maybe I'd try painting this time.  After researching a bunch more blogs, I decided milk paint was the way to go.  What's milk paint, you ask?  No it doesn't have milk in it (I may or may not have believed that for a while).  Here's the definition.  Basically it's amazing paint.  Because I loved the gel stain from General Finishes, I decided to stick with that company and try out their milk paint.  I was impressed with their color selections


After much deliberation I decided on Antique White for the color.  I wanted a very 'boring' color so it wouldn't clash with their room colors.  And as their styles changed I didn't want to have to repaint them. 


So with that decision made I started scouring Craigslist for cheap dressers in need of TLC. 

I found this beauty and it's matching tall dresser.  It also had a mirror attached.


While I was at it I decided to find a headboard/footboard for Hannah's new full size bed.  And that's how I came to own this beauty.

So then the fun began. 


As with my last post, here's the steps I used::


1) clean that wood with a good cleaner/degreaser like Krud Kutter or something similar.  Since these items had never been in a kitchen a dregreaser wasn't as important, but I had it on hand so that's what I used. Again I'm cheap frugal
2) Degloss.  I used the same product I did for the kitchen cabinets since I had it on hand and it worked so well for the cabinets.  Sanding is only necessary if you find a rough spot on the wood.
3) Paint away.  Let me mention something here.  If your wood is very dark and you're trying to paint it a light color, you must use a primer first!  For the bed, the wood was so light I didn't bother with a primer.  However, for the dark dressers, I did prime first.  I used a product called Stix.  Amazing product.  I linked the product on Amazon, but you can find it locally too.  I'm pretty sure I bought it at The Woodsmith Store. It literally sticks to anything.  The base of the dressers were real wood, but the tops were particle board.  It was imperative to use a product that would adhere to the glossy particle board. 

Making progress.  Those ball things were a bear to paint!
4) I would suggest 2 coats of color followed by a sealer.  I used the General Finishes Top Coat in Satin finish.  It was great.  But you can use whatever finish you like.  They make flat, semi-gloss, glossy.  Lots of options. 
5) DONE!  Let dry for at least 24 hours and cure for about a week before adding knobs or using for clothes/bedding.

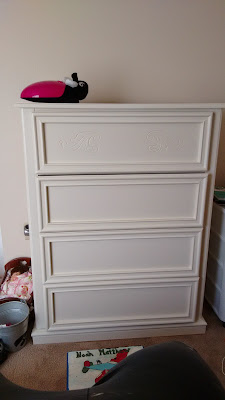
The dresser.  I really liked the detail on the first drawer.  We have since added knobs.


The mirror before we hung it on the back of the dresser.  Ignore the mess in the background.  This was in our apartment as we were trying to pack/move. 


Finished headboard
Hannah's bed with the finished headboard/footboard.
So, that's what I did for their beds/dressers.  I think I spend a total of $150 on all the furniture from Craiglist.  And then the paint, which wasn't too expensive.  I think I spent about 15 hours total on the painting.  But since I enjoy doing it, I didn't mind it.  It's relaxing to me.  :)