Sunday, January 31, 2016

Restuffing couch cushions

We've had our couches for over 10 years.  They aren't anything super special, but we bought them new and actually got to pick the pattern for them.  They are England brand.  (highly recommend that brand, by the way).  These couches have moved with us twice and were stuck in storage for 6 months.  They've been troopers.  But lately they've been showing their age.  Over Christmas when we had a house full of people, you could just about touch the floor after sitting down.  The support was nearly gone.  I'll admit I had a few giggles watching Joel's family members trying to get up out of the couch.  They'd try to get a running start to boost themselves up.  Cue perverse laughter.

So it was time to do something.  Because I don't have a few thousand dollars just sitting around waiting to be spent on new furniture I turned to my good friend Pinterest.  I figured others would have the same problem I did.  Yep.  So many pins on how to fix your couch cushions.  After reading a bunch of blogs and watching a few videos I gave it a try.

Here's what you need::
1) Scissors or sharp knife for cutting foam
2) Cheap paint drop cloths, or other type of thin plastic (get the same number of plastic as you do cushions)  I bought a 3-pack for $2.67 at Menards.  Since I had 6 cushions to do, I bought 2 3-packs.
3) Foam inserts.  I bought these, but you can get what you want.
4) Vacuum with hose attachement
5) Garbage bag to throw away all the debris

Here's how it went::
Step 1: Take off your cushion covers.  There should be a zipper somewhere on the side so you can just whip those suckers off.  I went ahead and washed them all.  These cushions had seen a lot of use over 10 years, including 2 children potty-training.  They needed a good washing.  I just threw them in the wash on cold in the delicate cycle and then hung them up to dry.  No problems with shrinkage.

Step 2: After you take off the covers you're going to see something like this:
  It's a foam insert covered in what looks like quilt batting and a cover of some sort.  I've seen other that only have a quilt batting covering the foam.  Whatever.  The point is that you need to get straight to the foam.  SO, this is what I did...
 Take off whatever is covering the quilt batting, if you have anything there.  Just rip it off. Be gentle, but get it off.
The "open" the foam.  Mine was adhered together on three sides so I gently pried it apart.  Now it looks like a book.  Some might have the two pieces of foam completely separated.  Good for you.  That little square piece of foam was all the extra support that came with the cushion.

Step 3: Time to insert new foam.  I ordered 2 big pieces of foam from Amazon.  I knew I'd have to cut them to size, but that was fine with me.  I put the big piece of foam snug in the 'book' and closed it.
*Now there are some blogs I read that said you need to use spray adhesive to make sure everything stays put.  I didn't do this for the simple reason that I forgot to buy any at the store and I wasn't making a trip just for that.  But do what you want.
 Now it kinds looks like a big sandwich.
Then I cut the foam to size.  As you can tell I was super precise about it.  I just hacked it with some scissors.  The foam company website said you could cut it with a bread knife, but I didn't want to get up from my comfy spot on the floor and my scissors were right next to me.  Notice the square piece of foam that was original to the cushion.  I figured I'd just put that in for kicks.


Step 4: Time to get everything back in your freshly washed cushion cover.  Now's where it gets cool.  Here's the fun part.   Get the cheapest piece of plastic you can find (I used paint drop cloths because I watched a video and that's what they did...buy the cheap ones though)  You're going to end up having to rip that plastic to shreds so you don't want anything too tough.  Wrap the cushion in the plastic.
Then take your vacuum hose and shove it in between the foam inserts.
Turn on the vacuum and watch it shrink down to nothing.

While the vacuum is still running (this is important), slide the cover back on.
When you have the cover in the correct position turn off the vacuum and watch the magic happen. (If you turn off your vacuum before you have the cover in position the foam will reinflate as you're positioning it.  Makes it really hard to get the cover all the way on)
BOOM! The foam has reinflated and it's all snug in there.

Step 5: Get the plastic out of there.  Now aren't you glad you took my advice and bought the cheapest, thinnest plastic you could find?  After trying this a few times I learned a little trick to this.  Reach your hands down as far as you can between the plastic and the cover and made some tears.  Start pulling it out.  Then flip it over and pull from the bottom.  Because you made tears all across the bottom it should be pretty easy to get the plastic to slide out.

Now to zip it all back up. Be careful at this point.  You'd think zipping would be easy, right?  Well the cushions are a lot fuller than they were when you took off the covers so just be prepared to shove some foam back where it belongs.  Go slowly and you'll do fine.

And DONE!  Get some wine and sit back on your new fluffy cushions.

Cost::
Foam: 15.95 x 2 = $31.90 (there was free shipping when I bought it from Amazon)
Plastic drop cloths: $2.67(for a 3 pack) x 2=$5.34
Total Cost: $37.24

It took me about an hour to stuff everything back in to the covers.  Is it perfect?  No.  Are they as good as the day we bought them?  No, but there are close.  The couches are 10 years old, nothing will change that.  But it by doing this I've given them a few more years of life, that's a win in my book.

Monday, January 25, 2016

Another project...

Before we moved to our new house I knew the kids needed new dressers.  Hannah was using my old one from when I was a kid and it was quickly falling apart.  Noah was still using his old changing table at we had bought new when Hannah was born.  So, it was small and almost 10 years old. 


Because we're cheap and didn't want to spend $500 for a single dresser at a furniture store, I decided to try out my painting ability.  I had already gotten some practice on staining the kitchen cabinets, so I thought maybe I'd try painting this time.  After researching a bunch more blogs, I decided milk paint was the way to go.  What's milk paint, you ask?  No it doesn't have milk in it (I may or may not have believed that for a while).  Here's the definition.  Basically it's amazing paint.  Because I loved the gel stain from General Finishes, I decided to stick with that company and try out their milk paint.  I was impressed with their color selections


After much deliberation I decided on Antique White for the color.  I wanted a very 'boring' color so it wouldn't clash with their room colors.  And as their styles changed I didn't want to have to repaint them. 


So with that decision made I started scouring Craigslist for cheap dressers in need of TLC. 

I found this beauty and it's matching tall dresser.  It also had a mirror attached.


While I was at it I decided to find a headboard/footboard for Hannah's new full size bed.  And that's how I came to own this beauty.

So then the fun began. 


As with my last post, here's the steps I used::


1) clean that wood with a good cleaner/degreaser like Krud Kutter or something similar.  Since these items had never been in a kitchen a dregreaser wasn't as important, but I had it on hand so that's what I used. Again I'm cheap frugal
2) Degloss.  I used the same product I did for the kitchen cabinets since I had it on hand and it worked so well for the cabinets.  Sanding is only necessary if you find a rough spot on the wood.
3) Paint away.  Let me mention something here.  If your wood is very dark and you're trying to paint it a light color, you must use a primer first!  For the bed, the wood was so light I didn't bother with a primer.  However, for the dark dressers, I did prime first.  I used a product called Stix.  Amazing product.  I linked the product on Amazon, but you can find it locally too.  I'm pretty sure I bought it at The Woodsmith Store. It literally sticks to anything.  The base of the dressers were real wood, but the tops were particle board.  It was imperative to use a product that would adhere to the glossy particle board. 

Making progress.  Those ball things were a bear to paint!
4) I would suggest 2 coats of color followed by a sealer.  I used the General Finishes Top Coat in Satin finish.  It was great.  But you can use whatever finish you like.  They make flat, semi-gloss, glossy.  Lots of options. 
5) DONE!  Let dry for at least 24 hours and cure for about a week before adding knobs or using for clothes/bedding.

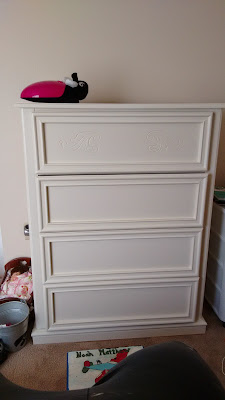
The dresser.  I really liked the detail on the first drawer.  We have since added knobs.


The mirror before we hung it on the back of the dresser.  Ignore the mess in the background.  This was in our apartment as we were trying to pack/move. 


Finished headboard
Hannah's bed with the finished headboard/footboard.
So, that's what I did for their beds/dressers.  I think I spend a total of $150 on all the furniture from Craiglist.  And then the paint, which wasn't too expensive.  I think I spent about 15 hours total on the painting.  But since I enjoy doing it, I didn't mind it.  It's relaxing to me.  :) 

Thursday, January 21, 2016

Cabinet Transformation

So in my last post I mentioned that we moved to a new house and needed to paint/stain the cabinets.  A few people have asked how I did that, so I thought I'd just blog about it.  Let me start by saying I am by NO means an expert on this.  In fact, I read tons of blogs on how to do this before actually doing it.  And I looked at Pinterest for hours before choosing the color I wanted.  So if you're wanting to do this to your cabinets, please please please do the research before starting.  It's a long endeavor.  This isn't a weekend project. 


This is how our cabinets looked when we moved in.


Yuck.  They were an ugly orange color.  I think it's called 'golden oak' or something gross like that.  Basically it's what the builder puts in their new builds because it's cheap and looks half-way decent.  But totally not my style.  I might have been able to live with them for a while if they were in good condition.  But they weren't.  They were worn and sad looking.  I think the previous owners were rough on them.  I dunno.  But whatevs.  It was time for something fresh and new for our home. 


Since I didn't have an extra few grand just lying around, I decided to just do it myself.  I think our realtor choked when I told him I'd do it myself.  He warned us that he'd seen many kitchens destroyed by a well meaning DIY project.  He didn't know me well.  :)


SO after researching and spending WAY too much time on pinterest, I decided on dark cabinets.  The thing I kept seeing over and over was java gel stain.  So after researching that specific color, I came up with this: General Finished Gel Stain in Java.  I bought it from Amazon, but if you live in DSM you can buy it at The Woodsmith Store on Hickman.  That store is awesomesauce.  Seriously, check it out. 


I wanted to practice some before actually staining our entire kitchen only to find out I hated the color or something.  So I went to the Habitat for Humanity Restore and bought a cheap cabinet door to practice on. 


I tested out two different paint brushes, hence the green tape in the middle. 


After researching a TON, here are the steps I used::


1) use a degreaser/cleaner to get all the gunk off the door.  Seriously until you clean it, you don't realize how gross the doors can get.  Especially the ones around your stove.  All that grease that just sticks to the door will prevent the stain from adhering.  Do yourself a favor and clean it first.  I used Krud Kutter, only because someone else did.  I thought it did a fantastic job.


2) Deglosser.  Skip the sanding.  So many blogs I used said to sand down your doors.  Unless your doors are in super rough shape, skip it.  A deglosser will take off the 'shine' and allow the stain to adhere.  I used Klean Stip Sander Deglosser.  Only because that's what Home Depot had and it was cheap.  A little goes a long way on this one.  Make sure you're in a ventilated area.  I got a little high off the fumes.  :)


3) Start staining.  I highly suggest using gloves.  You're going to end up getting stain on your hands, just accept that.  Unless you want brown nail and cuticles for the next few weeks, buy yourself some gloves.  Just get the cheap box of gloves at the hardware store.  Usually less than $10 for a box of 100. 


4) BE PATIENT!  Let the stain dry before doing a second coat!!  Since we were in the process of painting our entire house, I would do a coat, do something else for a few hours, and then go back for another coat.  I did two coats of gel stain with about 4 hours in-between coats. 


In the process of staining.  Those orange things under the doors are these cool painter's tepees that you use to prop things off the floor.  They were super helpful but are by no means a necessity.


I started out in the garage but it got cold so I brought everything into the living room.  We had already taken out all the carpet so it was the perfect work space.


After staining all the cabinets.  Make sure to tape well! 


5) Top coat.  General Finishes makes several different polyurethane topcoats.  I chose a satin finish, but you can choose semi-gloss, flat, glossy...whatever your heart desires.  I used a brush for this too.  After doing other painting projects I would choose a super smooth small foam roller instead.  I think the finish is a little better with the roller.  Plus it'd be faster. 


6) LET DRY FOR AT LEAST 24 HOURS!  I can not stress enough the importance of allowing adequate dry time.  You've just spent several days doing this project.  The last thing you want is to ruin it in your excitement of being done. 


DONE!  Put everything back in it's place and have a glass of wine.  You deserve it! 


So here are a few tips I learned from my endeavor::


1) take the time to prep properly.  Use painter's tape, clean the cabinets, degloss etc.  It's easy and fairly quick.  You'll be so much happier in the end!
2) buy cheap brushes for the stain.  Some people suggested using the foam brushes.  I didn't like those as well, but that's my preference.  When you practice on a cheap piece of wood see what you like best. The stain WILL NOT come out of the brushes.  So why bother?  Just buy cheap ones and toss them when you're done.
3) don't be rushed.  Make sure you have the time/energy/space to do this.  It's not a weekend project!
4) don't be fooled by "box cabinet transformation" kits you can buy at the hardware store.  It seems like it'd be cheaper/easier but it's not.  Everyone I know who has used the box transformation kits has regretted it.  Within a year it's coming off and looks terrible. 


So here's the finished project:

Full disclosure: this pic was taken after we got new quartz countertops.  SO that's why there's no faucet yet.  And since then we've put in brushed nickel hardware on the doors/drawers.  And we bought all new stainless steel appliances.


Believe me, this is not a difficult project to do.  It's WAY cheaper than buying new cabinets.  And it's awesome knowing I did something myself.  :)

Where'd 2015 go??

So apparently I haven't blogged in over a year.  Sorry about that.  For the 5 people who actually read my blog, they must have thought I died.  Alas, I did not.  We moved.  That's what happened in 2015.  And I changed jobs.  That happened too. 


After over a decade in Ankeny, we decided to move back to the west side of Des Moines.  Joel works over there and the commute was about killing him.  Some days it would take over an hour to get home because of the traffic.  For a small-ish town like DSM, that's a ridiculously long commute.  The school year had already started when we made this decision and we didn't really want to yank the kids out mid-year, so we thought we'd wait until the spring to sell.  Our realtor had other plans.  He strongly urged us to sell in the fall 2014 because the market was so hot and "everyone sells in the spring".  So we did it.  We listed our house.  2 weeks later it sold.  Holy crap nuggets.  I was not prepared for that.  So now what?  We decided to get an apartment in Ankeny for the winter so the kids could finish out the school year, and we could take our sweet time looking for a house. 


6 months in an apartment with 2 kids was...well, interesting.  The apartment itself was fine.  It was a two bdrms/two bath so the kids had to share a room.  Luckily it was a large second bedroom so they kinda had their own wing of the room.  And we had a first floor apartment, which I didn't know if I'd like, but after moving all our stuff in and then our again 6 months later, I was glad for no stairs. 


So we found a house in Waukee that we loved and moved in around Memorial Day.  It needed a little work, but it was in the location we wanted and priced well enough for us to do all the work it needed.  We closed on the house but stayed in our apartment for a few more weeks in order to get the work done.  The house needed painted all throughout, new carpet, a deep clean, and cabinet painting/staining.  (My next post will be about the staining I did).


So we moved in and love it.  Our neighborhood is fabulous.  There are tons of kids about our kids' ages so they made friends really quickly.  The kids love their new school.  So all in all, it was a great decision to move to Waukee.


As far as my job goes, in March I made the tough decision to leave The Iowa Clinic and take a job with the VA Hospital in DSM.  My new job allows me to be home with the kids before and after school.  I work part-time, just 10-2.  I'm learning new things and getting a great respect for the men and women who have served our country.  It truly takes a great person to fight for our freedom and potentially give their life for our country.  Most of the patients I see are from the Vietnam War era.  We do still have a few WWII vets, and we're getting more younger guys from the Afghanistan and Iraq wars. 


So that's what's been happening for the past year.  The kids are great.  They're growing like weeds.